|
CASTING CALL!
|
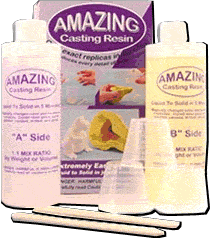
Amazing Casting Resin -- $11 USD Sale Price |
 © 2006 Amazing Mold Putty |
Over the weekend I set out to duplicate some small 28mm grave mounds that I made a while back. Simple mounds of earth (and a few rocks) with simple flat-board tombstones. Lots of gravel and wood textures, but not a lot of detail, really, and no undercuts or anything like that. Since I didn't know anything about molds and resin, I did some research and found some great tutorials online:
THE MASTERS
When I got home and took a look at my potential masters, I didn't like any of them. They were great for how I had been using them as game props, but they were very large and I decided I didn't want to duplicate them, especially since the size would take a lot of resin to fill. So I spent Friday night and Saturday afternoon making some new masters that are more to scale. I used JB Weld and Ace Hardware 5-Minute Epoxy over Styrofoam, cardboard, railroad talc, and more epoxy to make new masters, layering it on to make the small mounds. The gravestones were made of balsa wood, which turns out to be too soft to hold much detail like wood grain. All in all, four of them came out good enough to actually attempt duplicating.
| THE MOLDS | |
 © 2006 Amazing Mold Putty |
When I finally had the masters ready, it was time to break out the Amazing Mold Putty. This product certainly lived up to its name: it was VERY easy to work with. I just rapidly kneaded the two parts together until I had a uniform light yellow color: about 1-2 minutes, max. The putty is a pleasure to work with because it feels and behaves just like modeling clay or Play-Doh. Very smooth, very light, and very easy to shape around the object. This stuff was a true joy to work with at this step of the project. It felt very solid and sturdy when it cured. |
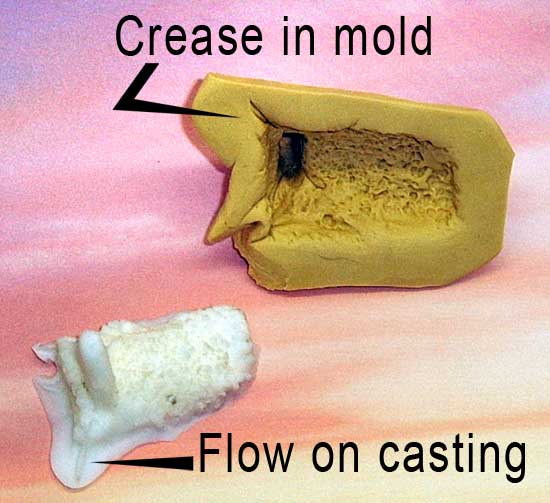
I then shaped it into a thin sheet and placed it over the top of the model. This required a lot of pinching and prodding and, in more than one instance, the tombstone poked through the putty and I had to squinch it around to fix it and make it fit (I even made a patch out of other clay to cover one of the holes). I particularly had trouble folding the edges around the base of the mold because the putty wanted to create "folds" or creases in the putty. This took a bit of work to smooth out, and on the last mold I ran out of working time and it left a definite crease in the final mold which led to problems in the final pour.
JUST DO A LITTLE BIT AT A TIME
This was the last mold I made and I was running out of time. Once the putty is mixed, you've only got about five minutes to break it into smaller pieces, roll them out and form them around your masters. In this case, I bit off a little more than I could chew (so to speak). On the other molds, I had time to pinch and force the putty together and smooth out the creases and folds caused by forcing the putty around the grave stone. In this case, the putty hardend faster than I could smooth it out, so I wound up with some definite creases which trapped extra resin that I had to later trim off the finished piece.
The main area of concern was the tombstone. As noted above, they kept poking through the putty during the shaping process and it took a few attempts before I could get the clay to snuggly conform to the thin, flat pieces jutting up from the organic-shaped mounds of earth.
Because I had used layered, liquid epoxy to build the masters, I didn't have a lot of detail on the "stones." In the future, I will work to exaggerate the wood and stone details so they will come out better.
The molds, by the way, cured in about 15-30 minutes. I gave them 45 minutes. When cured, they feel like a hard rubber. They seem durable and, after one casting, I did not see any damage to them. I suspect I used more clay than needed, though, and on my next effort will try to be a bit more sparing so the molds will be a little more flexible during the release process.
Now, the finished molds were very lop-sided and would not sit up straight. This, of course, was going to make it impossible to pour correctly (the liquid would just pour out of the side like a waterfall). I toyed around with putting a stick or other flat item under the earth mound portion of the mold, but it was too wobbly. Then I was going to make a custom rack for them out of Styrofoam, but my wife grabbed an old plastic ice cube tray and the molds fit into it perfectly. I am married to a brilliant woman! |
 LOP-SIDED MOLDS When pouring, you need to have the top of the mold at a flat angle in order for the base to be even. As you can see in the photo below, we handled this problem with a very simple solution. |
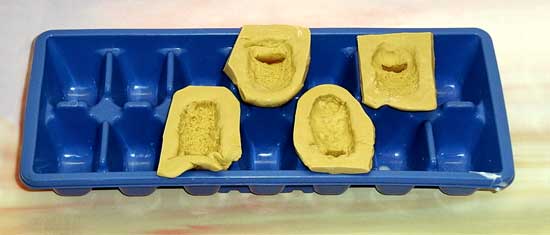
A COOL & SIMPLE POURING RACK
The ice cube tray worked like a charm, and since it was old we didn't care if it got splattered with resin (and it did). It also worked well to catch spilled resin, which helped in the clean-up process.
| THE RESIN | |
 © 2006 Amazing Mold Putty |
The Amazing Casting Resin is a standard 2-part mixture that comes in two 8-ounce bottles. The kit came with measuring cups and mixing paddles (flat Popsicle sticks). I took a tip from a TAP Plastics video (see the links above) and filled the molds with potato starch (its like a fine talcum powder) then emptied the starch into a measuring cup to find out how much resin to mix. Apparently I spilled more starch than I thought because I wound up not mixing quite enough resin. Next time I'll be more careful in this step. Before removing the lids, I marked them with an appropriate "A" and "B" so I could remember which one belonged to which bottle. I was worried that if they got mixed up, the residual liquid might mix with the other liquid and cure, sealing the bottles forever. |
I layered the workspace with newspapers. On it I had the two cups ready: resin and hardener. A disposable plastic drinking cup (which wound up being too deep I'm going to pick up some smaller, clear cups for this), and a disposable syringe (needle removed). We keep these on hand for medicating our animals and they are dirt cheap at your local feed store (assuming you have a local feed store, of course).
As per the instructions in the packaging, I heated the molds in the microwave (it recommends doing this because the heat helps in the curing process and is important for curing small details, and I thought the tombstones were a bit thin, so I figured I'd try it) for about 1 minute: the goal was to make them warm to the touch. I didnt want to overheat them because I had no idea how they would react to the heat the last thing I wanted to do was melt my new molds! Of course, that didnt happen, and later experiments proved that 2 minutes on high in the microwave didnt do any harm to them.
It was finally time to mix the resins: I poured them into the plastic cup and began to stir. This is when I realized that a clear, smaller cup (8 oz.) would work better. Nevertheless, I stirred until I was sure it was mixed properly, then shoved in the syringe and sucked up the resin. I quickly shot it into the tombstone cavity of the first mold, and then filled the rest of the cavity. I repeated this process: sucking up resin, shooting it into the tombstone first, and then filling the grave mounds. My wife was holding the cup in her hand and commented on the heat she felt it generating. I knew we were running out of time, so she poured the resin into the graves, topping them off.
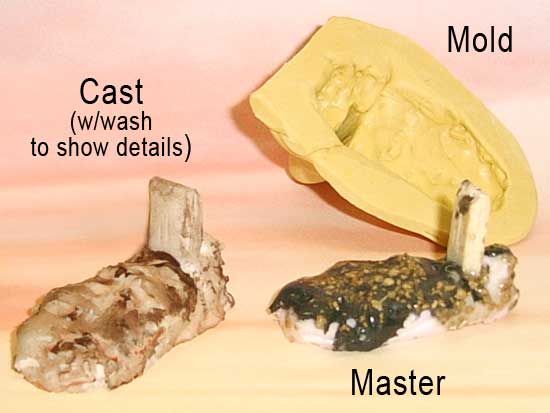
 SHORT POUR The "short pour" on the left has a hole in it where we ran out of resin. It's next to its master, which was made out of JB Weld over cardboard and sprinkled with railroad talc. The headstone is actually cardstock covered with multiple layers of clear 5-minute epoxy, which did not do a good job of holding the detail of the "wood slats" texture I had carved into it. Note that some of the talc (stones) apparently stuck in the mold and were then pulled out by the resin, which is why there are a few small rocks in the cast piece. The rocks were pulled out of the mold during the first casting, so subsequent castings didn't have this problem. |
This is when we learned that we hadn't made enough resin. We were probably off by a teaspoon or two. Still, these are earthen mounds, so if some of them are smaller or irregularly shaped, it doesn't really matter that much. I also suspect that a fold in the corner of one of the molds might have filled up with some of the resin, making two of the mounds come off a bit short. The short pour left a "hole" in the thin edge of the earthen mound of one figure, and the other one was just a bit thin. I later found out that, after its cured, you can just mix more resin and pour more to "top it off." Apparently, the liquid resin will adhere nicely to the resin that has already cured. However, I didn't know that at this point, so I actually used shears and an Xacto blade to trim off the area around the hole. Since this is a rough, organic shape, this didn't harm the look of the final piece. |
Next up: vibrating. I had read on The Miniatures Page about the value of vibrating the resin to remove air bubbles. So, I had my plug-in neck vibrator on hand and touched it to the ice cube tray. I honestly can't say if this helped or not, I think I did see some air bubbles rise to the surface as the resin cured and changed from a thick yellow syrup to a vivid white color.
As per instructions, I left them alone for about 30 minutes and then de-molded them. I was surprised at how firm a pull I had to use to get the tombstones out of their cavity. But out they came and I was quite pleased with the results.
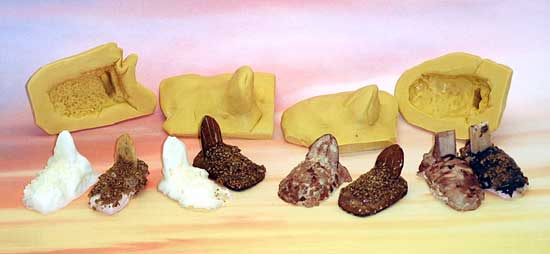
THE LINE-UP
The Amazing Casting Putty molds are in the background. In the front row, the cast is next to its master. The third and fourth casts have been washed with brown paint to bring out details.
Since this was my first experience with molds and resin, I wasnt sure how much effect the starch had on the release process. Later pourings revealed that it did help quite a bit. My second pouring didnt release very well (it took a lot of pulling to get it out), but my third (using starch again) went as well as the first. So, I definitely think the starch, or some kind of powder, helps when releasing these smaller pieces.
A MASTER WITHOUT A DISASTER
As you can see, the masters weren't the highest quality. This one was just a lump of extruded styrene (like the kind I used to make the Boot Hill graveyard walls in a previous tutorial) covered with JB Weld. I really liked the way the JB Weld (which is a two-part epoxy that is sold in two tubes: just mix equal portions and use a stick to dab it onto the base) flowed over things, giving it a nice, organic look. However, this particular epoxy was very messy and easily dabbed black, tar-like stuff on everything it touched. I will probably only use the JB Weld sparingly from now on.
The gravel/talc detail was all there, and even the faint wood grain on some of the stones was there (as noted above, I need to make these stronger, which means using basswood head stones instead of balsa). In later pourings I used basswood for the gravestones and the putty & resin did a very nice job of catching the detail.
Conclusions
These products were as easy to work with as promised and I felt I got my money's worth. There is a strong odor/fumes from the resin, so good ventilation is a must. The putty, however, is non-toxic and food safe (which is a nice bonus).
I was very impressed with the amount of detail that was captured by the mold putty and reproduced by the resin. The resin is a very bright white and does not feel at all grainy. I have not sanded it, but I did trim it with both shears and an Xacto blade with very pleasing results: there was no shattering or splintering.
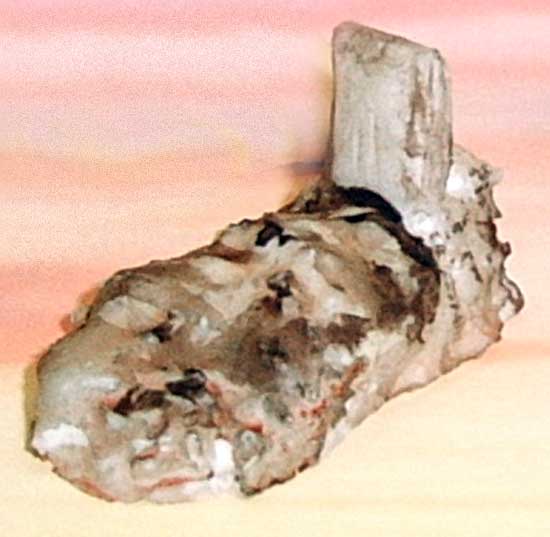
READY FOR MY CLOSE-UP
This is a very large photo of one of the casts I made. The finished item is stark white, which didn't photograph well, so I put a light brown paint wash on it. As you can see, there are lots of smooth areas that were made by layering the liquid epoxy on the master. The rocks and railroad talc came out very nicely, too. The head stone was originally cut from balsa wood, and its sharp edges were crisp and clean. You can also see some of the lines I made in the head stone, but the wood was so soft that these really didn't come out very well. In later masters I used hard wood and they held the detail a lot better. Also, remember that if you are going to paint them, you need ro rinse them in warm (not hot) water to remove any residues. This will make the primer adhere better. Speaking of which, when I did paint them, I used a brown (or rust) colored primer as my base coat.
I have no idea what the resin's temperature range is, so I don't know if it would survive being vulcanized, so I don't know if these resin pieces can be used as masters. This stuff is probably too expensive to use for any sort of production volume, but is definitely worth it if you plan to make several small items for yourself, and it would quickly (less than 1 hour) let you cast some samples of your masters before having them sent off to be professionally molded elsewhere. So far I've only done a few castings from these molds (and have made some more masters and molds). They do seem to be holding up fairly well. Again, I don't think you can use these molds to make hundreds of casts, but they've held up very well for the few dozen I've made so far.
It's also a fun way to spend an evening as you learn more about the joys of casting with resin.